adb shell
su
setprop sys.usb.config diag,adb
You must be rooted to give these commands as you may guess. What’s it for ? Latest command will open your phone’s Qualcomm Diag Port to work with. There may be some exceptions of course in which it won’t work, let me know if this happens in comments.
Remember our example phone in Part 1 was Xiaomi Mi5, you can either use this command, or depending on which rom you are you can use dial pad combination too, *#*#7177171#*#*. This info is valid for all Xiaomi Qualcomm’s not just Mi5. In Part 2 i will use a Mi5 S to work with, all Snapdragon 820 and 821 chipsets are the same when it’s about partition table, video will be ready on my Youtube Channel soon . I will give info about older chipsets too. By the way i’m sorry that this guide took some time to be finished, but better than none right ? Plus you will get world’s largest QCN archive soon.
So we all know what’s a Qcn backup now. It’s a backup of modem related partitions in Qualcomm structure. Which also includes modem baseband info + imei info. Having this backup, we can edit “imei” line (or lines; some phone models have 1 line, dual sim models have 2 lines obviously and all LG 1 sim models have 3 lines of imei info). But before that we will see how we can restore/upload the modified Qcn backup to the phone. If your imei became “0” somehow, you can edit an other Qcn taken from same model and restore your imei (+baseband) uploading that Qcn to your phone, no need for any other steps. BUT if you messed up your baseband (=invalid imei), you need to get rid of the write protection before. For this we are going to “empty/zero” necessary modem partitions = to delete the old/wrong values. After that we will be able to upload any Qcn we want, without any problems and errors. That is the answer why some readers having difficulties to restore Qcn’s to their phones. To do that, our phones must be rooted, because these are deep stuff now and we need to be very careful in every step. Saying it again, VERY CAREFULLY ! If you delete a wrong partition without checking it twice, you may end up with hard bricked phone in your hands. For many Chinese brands that won’t be a problem because they have their rescue roms, you can read those unbrick guides in my “UNBRICK” section, but for LG, HTC and some other known makers, you won’t have any PC based method to fix them, so VERY CAREFULLY !.
adb shell
su
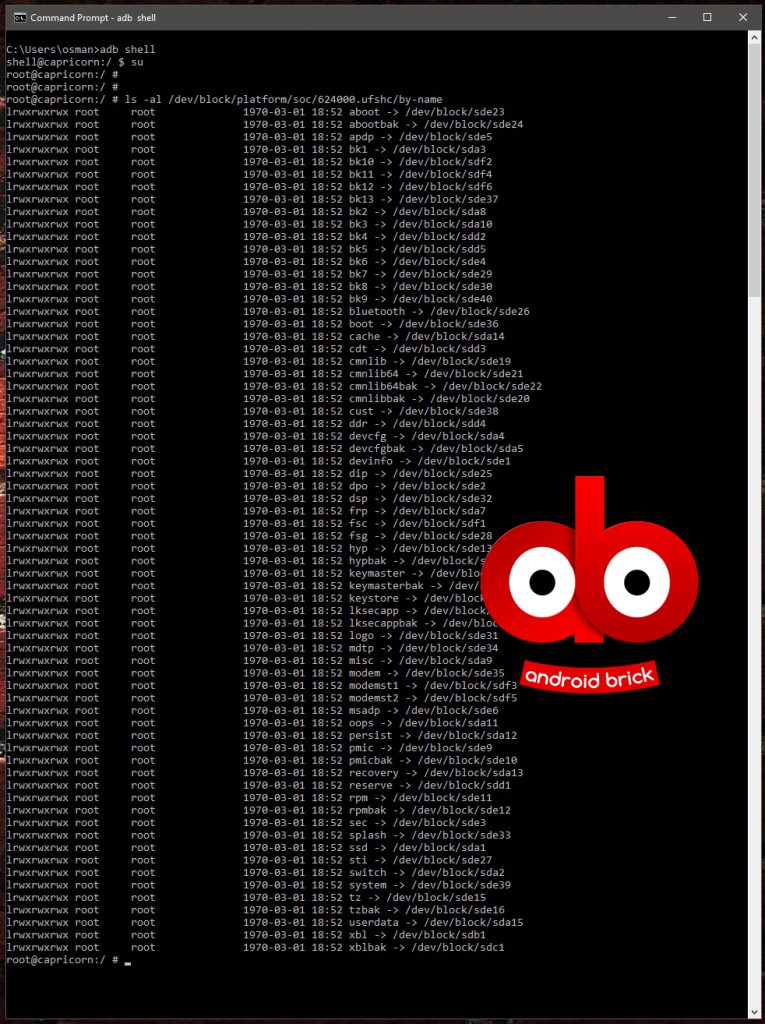
ls -al /dev/block/platform/soc/624000.ufshc/by-name (this is for new Snapdragon 820 series, it’s just ls/list command with right parameters. If this command won’t list your partition table by name just go back till /platform and see what your partition tables continues with)
This is the inside of your Snapdragon 820/821 based Xiaomi. Only 3 part form here matters for us, modemst1, modemst2 and fsg, those the partititions hosting your baseband and imei info (not all Snapdragons, but most Chinese made Qualcomms). Please keep in mind, this is very important, numbers are variable depending on the phone model, so names are important for us, not numbers, don’t try these numbers on a phone other then Mi 5 series, just list your parititon table and look for modemst1, modemst2 and fsg. Let’s zero/emty these 3 partitions :
dd if=/dev/zero of=/dev/block/sdf3
dd if=/dev/zero of=/dev/block/sdf5
dd if=/dev/zero of=/dev/block/sde28
reboot
Your phone will boot with an “invalid” imei, this means all the info is deleted. No need to worry as long as you have your QCN backup somewhere safe. Speaking of, its time to edit our QCN backup, let’s say our friend’s QCN backup with our imei number so we can fix our baseband including the right imei number.
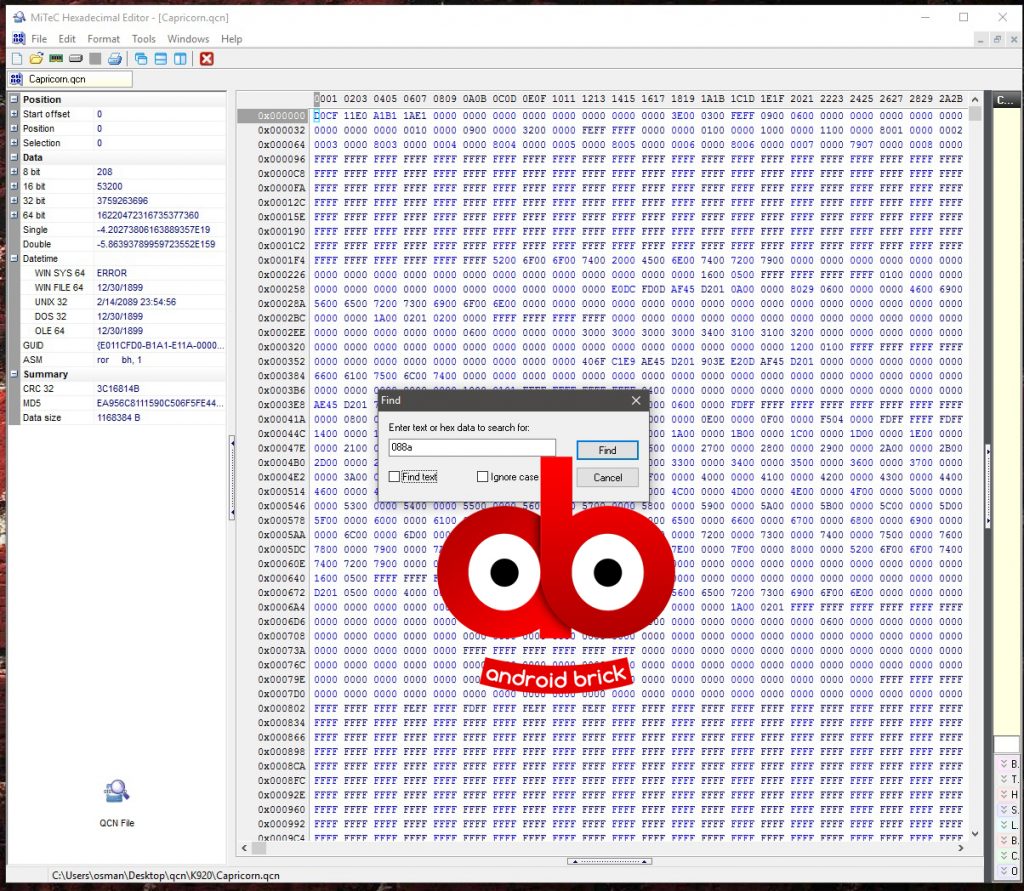
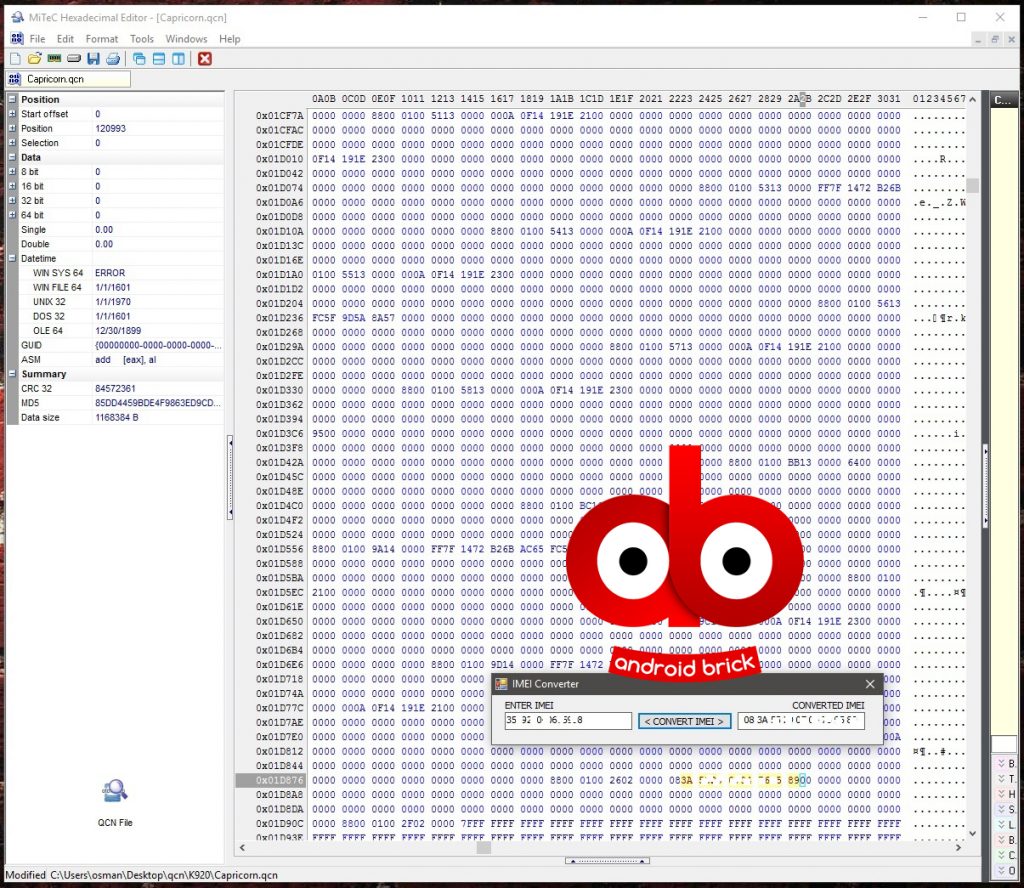
Search for the line starting with “088a“, IF your imei is starting with number “8”. The number before “A” is always your first imei number and thats what matters for us. If your imei number is starting with “3” for example, CTRL + F and find the line starting with “083a” (hex values only, untick “find text” if you are using same hex editor).
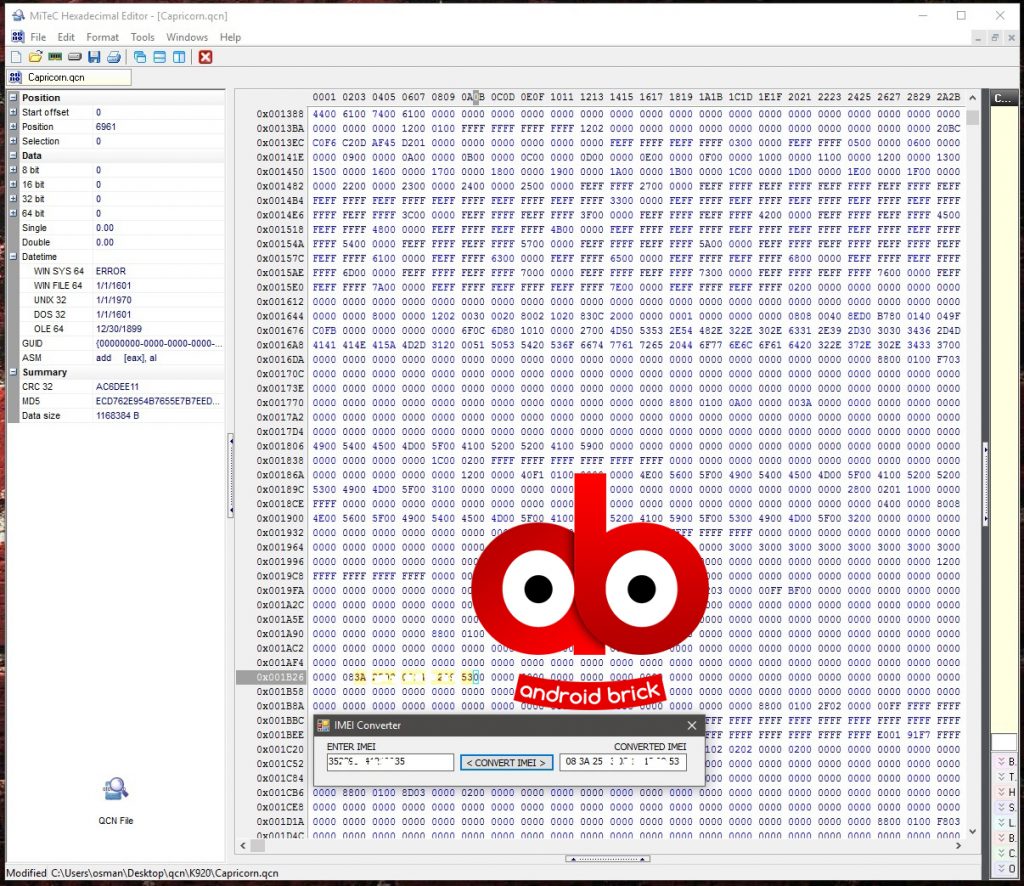
Prepare “imei converter” program that you have download before and put your desired imei number in it, click “convert imei” and you will get the right format that you need to put in your hex editor. Rest is easy just carefully change the line right after “08xA” including your first number with “x”.
Do the same for your second imei number hitting “F3” and finding the right line starting with “08xA“.
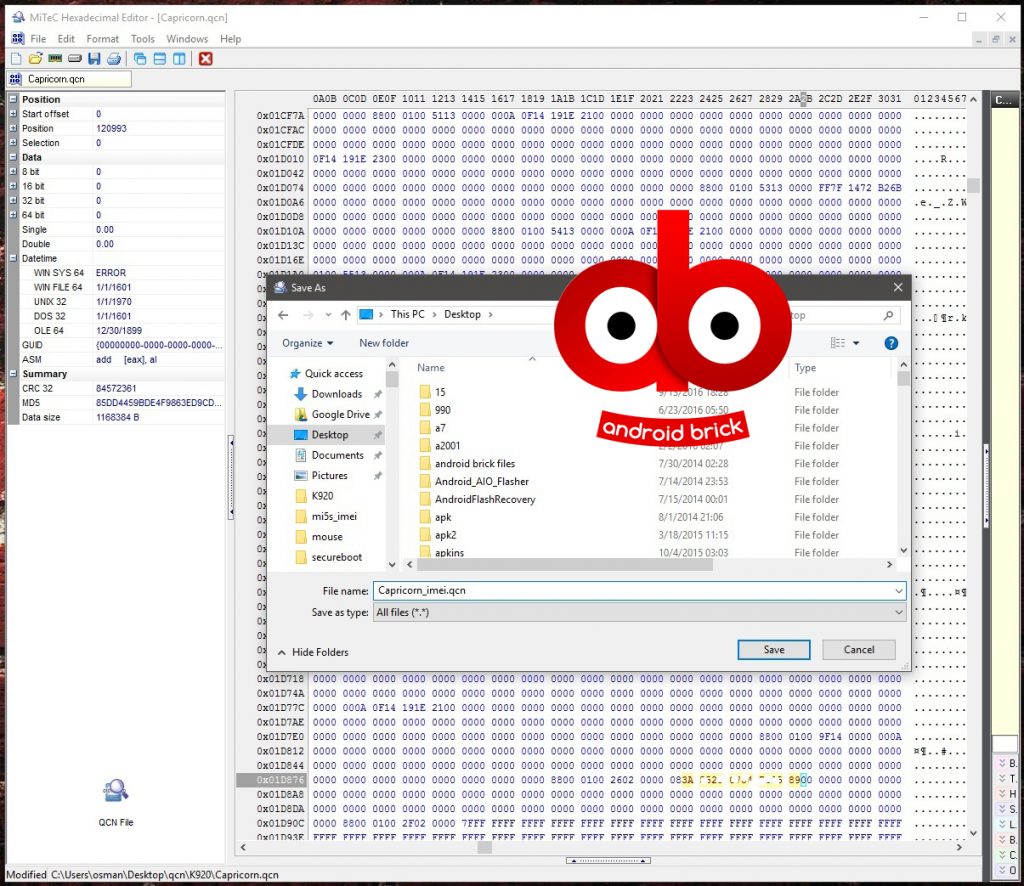
After you finished editing “SAVE AS” your QCN ! Don’t save it on the original backup, if you have done something wrong editing your original QCN file then you may corrupt it and there is no way to return and edit it again. So this is very important “save as” your new QCN with any name ending with “.qcn“.
You may guess the rest, remember we backed up our QCN in our Part 1 ? Now we will just do the same choosing “Restore” from “Software Download” opiton in QPST, with our new edited QCN file of course.
After you see “Memory Restore Completed” just reboot your manualy or with the “adb reboot” command from cmd.
You can use this method for almost every Chinese Qualcomm ( OnePlus owners sorry you can’t edit imei number, it’s encrypted ) + LG phones.
Your baseband including your imei number in it is fixed now, you are wellcome 🙂 See you in the next guide.
PS : Changing the imei number of your phone is ILLEGAL, do this steps to fix your lost original imei number or/and to fix your baseband ONLY !.
Ultimate Guide : Qualcomm Snapdragon imei and Baseband Repair / Fix – Part 1
Copyright © 2016 by androidbrick.com. All rights reserved.
Hi bro thanks alot for this awesome guide, i was able to restore imei successfuly
1- imei was null so i made it 0 by dd zero command
2- edited imei and put it in .xqcn file
3- Restored it and reboot
4-Now i have my imei back.
Everything goes well but the problem is when i reboot my phone it’s gone again
(When i check it it still there but imei sv become unknown) and i have to repeat all the process again. what might cause this problem?
Please i need help.
my device: Redmi 5 plus MEG7
Install EU rom, and try again please.
I’m already on eu rom 9.10.10
Should i install official miui?
Some Redmi 5 series need custom rom for imei repair.
Hello dear. I have Xiaomi Redmi 7. I do everything according to the instructions as you explained.
dd if=/dev/zero of=/dev/block/mmcblk0p36
dd if=/dev/zero of=/dev/block/mmcblk0p37
dd if=/dev/zero of=/dev/block/mmcblk0p32
By this commands i have erased modemst1, modemst2 and Fsg partitions. It is ok, Now Imei show -0
After i restoring by Qpst programm redmi 7 qcn file , so when i push to restart the phone goes into recovery and show message “nv data corrupted”
By twrp terminal i erasing partitions again by commanders zero and the phone boot normally , but imei show Null again. what am i doing wrong ?((
For some models you need UMT box to restore QCN, Redmi 7 is one of those.
Hi, I tried exact steps with a Xiaomi Redmi note 5 (MIUI 10, Android9, rooted and Unlock) but do not seem works for me.
In the first attemp my phone bricks and I have to recover with XioamiFlash.
In second attemp first, I backed the NVRAM, second, I delete modems and fsg, then, I edited the backup with the exact steps, and finnaly, I recovered the modified backup. Result: The phone have the same IMEIs. Do you have any Idea?
Make dd zero commands when phone is connected to TWRP, rest is the same, it will work.
How to connect COM port from TWRP? I have tried with command “su” and “setprop sys.usb.config diag,adb” in TWRP Console Shell but do not run…
In “su” command I receive “command not found”
My phone is rooted, I don´t know what happend.
Any idea?
Open diag port in system, not twrp.
hi. I did exactly as you said and everything went well. but at the end when I rebooted my device the IMEI was still the same as before. my device is mi 5. what can I do?
It’s because of new roms, ignore it and restore your edited QCN file to phone. If still the same, do all steps again with an older rom.
Tnx for your swift response. So for new xiaomi devices that can’t be downgraded there is no possibility to repair imei?
Some work, some won’t. Try this, do the dd zero commands from twrp recovery after just adb shell command, then reboot and restore with edited QCN and see what happens. BUT don’t forget to backup modemst1-2 and fsg img’s before deleting them, sometimes even restoring the original QCN does not work and in that situations you need to restore those partitions from twrp again.
You are the best. I’ll try that ASAP.
U R Welcome 🙂
oneplus 6t için yöntem var mı? cihazı rootladım, qcn yedeği tamam.fakat partionları sileceğim göremiyorum.
Box gerekiyor OnePlus için, ben yardımcı olurum, testandroidx@gmail.com
Mail gönderdim. Bilgileri verirseniz size getireyim cihazı.
Teşekkürler
Unfortunately, in my MI 6 nothing has changed.
After:
dd if = / dev / zero of = / dev / block / sdf (x)
dd if = / dev / zero of = / dev / block / sde (xx)
and reboot
IMEIs are still unchanged and the next steps do not change anything.
Before this phone was repaired in the service. Service changed something on the board and I have uploaded the original drive. I wanted to upload TWRP and ROM Xiaomi Poland. I probably deleted too much and now I have other IMEIs than on the box and problems with network coverage and data transfer. I want to keep the Xiaomi Poland ROM, TWRP and have my original IMEI numbers.
Use oldest rom you can find, restore edited QCN, it will work.
testandroidx@gmail.com, mail to me and I will send you original Mi6 backup, you can put your original IMEI numbers in it and rest is as in the article.
Pocopohone için de bu uygulama ise yararmi
Maalesef
beklenen den uzun surucek sanirim
[spoiler]adb>adb shell
tissot_sprout:/ $ su
tissot_sprout:/ # ls -al /dev/block/platform/soc/7824900.sdhci/by-name
total 0
drwxr-xr-x 2 root root 1020 1970-01-06 04:37 .
drwxr-xr-x 4 root root 1100 1970-01-06 04:37 ..
lrwxrwxrwx 1 root root 21 1970-01-06 04:37 DDR -> /dev/block/mmcblk0p16
lrwxrwxrwx 1 root root 21 1970-01-06 04:37 aboot -> /dev/block/mmcblk0p20
lrwxrwxrwx 1 root root 21 1970-01-06 04:37 abootbak -> /dev/block/mmcblk0p21
lrwxrwxrwx 1 root root 21 1970-01-06 04:37 apdp -> /dev/block/mmcblk0p45
lrwxrwxrwx 1 root root 21 1970-01-06 04:37 boot_a -> /dev/block/mmcblk0p22
lrwxrwxrwx 1 root root 21 1970-01-06 04:37 boot_b -> /dev/block/mmcblk0p23
lrwxrwxrwx 1 root root 21 1970-01-06 04:37 cmnlib -> /dev/block/mmcblk0p39
lrwxrwxrwx 1 root root 21 1970-01-06 04:37 cmnlib64 -> /dev/block/mmcblk0p41
lrwxrwxrwx 1 root root 21 1970-01-06 04:37 cmnlib64bak -> /dev/block/mmcblk0p42
lrwxrwxrwx 1 root root 21 1970-01-06 04:37 cmnlibbak -> /dev/block/mmcblk0p40
lrwxrwxrwx 1 root root 21 1970-01-06 04:37 config -> /dev/block/mmcblk0p30
lrwxrwxrwx 1 root root 21 1970-01-06 04:37 devcfg -> /dev/block/mmcblk0p11
lrwxrwxrwx 1 root root 21 1970-01-06 04:37 devcfgbak -> /dev/block/mmcblk0p12
lrwxrwxrwx 1 root root 21 1970-01-06 04:37 devinfo -> /dev/block/mmcblk0p24
lrwxrwxrwx 1 root root 21 1970-01-06 04:37 dip -> /dev/block/mmcblk0p33
lrwxrwxrwx 1 root root 21 1970-01-06 04:37 dpo -> /dev/block/mmcblk0p47
lrwxrwxrwx 1 root root 21 1970-01-06 04:37 dsp -> /dev/block/mmcblk0p13
lrwxrwxrwx 1 root root 20 1970-01-06 04:37 fsc -> /dev/block/mmcblk0p3
lrwxrwxrwx 1 root root 21 1970-01-06 04:37 fsg -> /dev/block/mmcblk0p17
lrwxrwxrwx 1 root root 21 1970-01-06 04:37 keymaster -> /dev/block/mmcblk0p43
lrwxrwxrwx 1 root root 21 1970-01-06 04:37 keymasterbak -> /dev/block/mmcblk0p44
lrwxrwxrwx 1 root root 21 1970-01-06 04:37 keystore -> /dev/block/mmcblk0p29
lrwxrwxrwx 1 root root 21 1970-01-06 04:37 limits -> /dev/block/mmcblk0p31
lrwxrwxrwx 1 root root 21 1970-01-06 04:37 lksecapp -> /dev/block/mmcblk0p37
lrwxrwxrwx 1 root root 21 1970-01-06 04:37 lksecappbak -> /dev/block/mmcblk0p38
lrwxrwxrwx 1 root root 21 1970-01-06 04:37 logdump -> /dev/block/mmcblk0p48
lrwxrwxrwx 1 root root 21 1970-01-06 04:37 mcfg -> /dev/block/mmcblk0p36
lrwxrwxrwx 1 root root 21 1970-01-06 04:37 mdtp -> /dev/block/mmcblk0p34
lrwxrwxrwx 1 root root 21 1970-01-06 04:37 misc -> /dev/block/mmcblk0p28
lrwxrwxrwx 1 root root 20 1970-01-06 04:37 modem_a -> /dev/block/mmcblk0p1
lrwxrwxrwx 1 root root 20 1970-01-06 04:37 modem_b -> /dev/block/mmcblk0p2
lrwxrwxrwx 1 root root 21 1970-01-06 04:37 modemst1 -> /dev/block/mmcblk0p14
lrwxrwxrwx 1 root root 21 1970-01-06 04:37 modemst2 -> /dev/block/mmcblk0p15
lrwxrwxrwx 1 root root 21 1970-01-06 04:37 mota -> /dev/block/mmcblk0p32
lrwxrwxrwx 1 root root 21 1970-01-06 04:37 msadp -> /dev/block/mmcblk0p46
lrwxrwxrwx 1 root root 21 1970-01-06 04:37 persist -> /dev/block/mmcblk0p27
lrwxrwxrwx 1 root root 20 1970-01-06 04:37 rpm -> /dev/block/mmcblk0p7
lrwxrwxrwx 1 root root 20 1970-01-06 04:37 rpmbak -> /dev/block/mmcblk0p8
lrwxrwxrwx 1 root root 20 1970-01-06 04:37 sbl1 -> /dev/block/mmcblk0p5
lrwxrwxrwx 1 root root 20 1970-01-06 04:37 sbl1bak -> /dev/block/mmcblk0p6
lrwxrwxrwx 1 root root 21 1970-01-06 04:37 sec -> /dev/block/mmcblk0p18
lrwxrwxrwx 1 root root 21 1970-01-06 04:37 splash -> /dev/block/mmcblk0p19
lrwxrwxrwx 1 root root 20 1970-01-06 04:37 ssd -> /dev/block/mmcblk0p4
lrwxrwxrwx 1 root root 21 1970-01-06 04:37 syscfg -> /dev/block/mmcblk0p35
lrwxrwxrwx 1 root root 21 1970-01-06 04:37 system_a -> /dev/block/mmcblk0p25
lrwxrwxrwx 1 root root 21 1970-01-06 04:37 system_b -> /dev/block/mmcblk0p26
lrwxrwxrwx 1 root root 20 1970-01-06 04:37 tz -> /dev/block/mmcblk0p9
lrwxrwxrwx 1 root root 21 1970-01-06 04:37 tzbak -> /dev/block/mmcblk0p10
lrwxrwxrwx 1 root root 21 1970-01-06 04:37 userdata -> /dev/block/mmcblk0p49[spoiler]
[spoiler]tissot_sprout:/ # dd if=/dev/zero of=/dev/block/dev/block/mmcblk0p14
dd: /dev/block/dev/block/mmcblk0p14: No such file or directory [spoiler]
please tell me what I’m doing wrong?
“No such file or directory ” ignore this error, it’s not relevant.
dd if=/dev/zero of=/dev/block/dev/block/mmcblk0p14
dd if=/dev/zero of=/dev/block/dev/block/mmcblk0p15
dd if=/dev/zero of=/dev/block/dev/block/mmcblk0p17
reboot
imei number is “null” or no change ?
привет!!!!!!! помоги пожалуйста я не понимаю что не так!
[spoiler title=”C:\Tools>adb shell
adb server is out of date. killing…
* daemon started successfully *
tissot_sprout:/ $ su
su
tissot_sprout:/ # ls -al/dev/block/platform/soc/7824900.cdhci/by-name
ls -al/dev/block/platform/soc/7824900.cdhci/by-name
usage: ls –color[=auto] [-ACFHLRSZacdfhiklmnpqrstux1] [directory…]
list files
what to show:
-a all files including .hidden -c use ctime for timestamps
-d directory, not contents -i inode number
-k block sizes in kilobytes -p put a ‘/’ after dir names
-q unprintable chars as ‘?’ -s size (in blocks)
-u use access time for timestamps -A list all files but . and ..
-H follow command line symlinks -L follow symlinks
-R recursively list files in subdirs -F append /dir *exe @sym |FIFO
-Z security context
output formats:
-1 list one file per line -C columns (sorted vertically)
-g like -l but no owner -h human readable sizes
-l long (show full details) -m comma separated
-n like -l but numeric uid/gid -o like -l but no group
-x columns (horizontal sort)
sorting (default is alphabetical):
-f unsorted -r reverse -t timestamp -S size
–color device=yellow symlink=turquoise/red dir=blue socket=purple
files: exe=green suid=red suidfile=redback stickydir=greenback
=auto means detect if output is a tty.
ls: Unknown option /dev/block/platform/soc/7824900.cdhci/by-name
1|tissot_sprout:/ # ls -al /dev/block/platform/soc/624000.ufshc/by-name
ls -al /dev/block/platform/soc/624000.ufshc/by-name
ls: /dev/block/platform/soc/624000.ufshc/by-name: No such file or directory “]
не получается! что я не так делаю?
English please…
Hello. Who can throw me a your QCN backup please. Phone MEIZU M6 note 3\32. I really need it.
Sorry I don’t have it.
Merhaba, tutorial icin cok sagol.
Redmi Note 5 Pro’da nedense IMEI bir türlü degismiyor. 3 bölmeyi sifirladiktan sonra reboot ediyorum, IMEI hala ayni orada duruyor, yani kendiliginden silmeden önceki forma dönüyor. Acaba Xiaomi de artik bir türlü koruma mi koydu? Bootloader acik bu arada.
2 kere geldi, 2 kere hallettim sorunsuz, farklı bir yöntem uygulamadan.
Evet, ben de sonunda basardim. Neden öyle oldu anlamadim ama recovery’de iken 3 bölmeyi sifirlayinca oldu 🙂
Cihan bey bendede aynı şey oluyor. Nasıl yaptınız acıklarmısınız?
Hi there,
Thanks for the tutorial. I’ve HTC Sensation (rooted, s-off, bootloader unlocked, stock kernel).
Unortunately I’m stuck at not being able to enable diag mode / open qualcomm ports on my phone.
I’ve tried with the adb shell command but after hitting enter nothing happens (the device it’s listed if I enter adb devices).
Could you please help me out?
Thanks a lot
https://www.androidbrick.com/htc-sahipleri-snapdragon-larinizin-imei-lerini-tamir-edin/
866408027xxxxxx
866408027xxxxxx
plz add this imei..Redmi 5 plus
Don’t share your imei numbers online. same method as in the article.
Hi, can you help me please?
I have Samsung sm-j510fn, MSM8916, TWRP 3.1.1, root, stock OS. Trying to change imei’s on it.
First problem: I can’t wipe current imei’s. dd says “no space left on device”
Here are my commands:
root@j5xnlte:/ # dd if=/dev/zero of=/dev/block/mmcblk0p14
dd: /dev/block/mmcblk0p14: No space left on device
6145+0 records in
6144+0 records out
3145728 bytes transferred in 0.548 secs (5740379 bytes/sec)
1|root@j5xnlte:/ # dd if=/dev/zero of=/dev/block/mmcblk0p15
dd: /dev/block/mmcblk0p15: No space left on device
6145+0 records in
6144+0 records out
3145728 bytes transferred in 0.553 secs (5688477 bytes/sec)
1|root@j5xnlte:/ # dd if=/dev/zero of=/dev/block/mmcblk0p9
dd: /dev/block/mmcblk0p9: No space left on device
6145+0 records in
6144+0 records out
3145728 bytes transferred in 0.213 secs (14768676 bytes/sec)
So my current imei’s won’t wipe. The block names are correct, given from the ls command.
Second problem: QPST can’t do restore original or edited QCN. I receive an error: “received an invalid command from the phone”. I’ve tried different QPST versions, on different PCs. But I can BACKUP QCNs with no problems, always.
I’ve already SOLVED the second problem using QFIL instead of QPST. So I can restore edited QCN now with no problems. But it is useless, due to not wiped blocks, imei’s stays the same.
I know you’re saying that instruction is only for chinese phones, no samsung, but hey! Actually there are only dd error problem. Maybe it is possible to fix?
I can provide additional info if you need. Do you have any ideas?
“no space left on device”, ignore this error it’s not relevant. But you can’t change imei on Samsung’s with this method sorry. Samsung uses another method named “cert”.
Thanks for paying attention!
So I need Z3X box + samsung tool pro for this kind of work? Will it solve my case?
If you know how to edit Samsung’s cert file and put a new imei in it, after you grab it with Z3X box of course, then you are good to go yes. You are welcome.
I have used twrp to reflash rom and could restore QCN. However, after finished, when I checked the phone using *#06#, the second MEID appeared (MEID1 and MEID2). MEID 2 is my original ID, MEID1 I guessed it belonged to the QCN file I downloaded. Also, the IMEI 1 is show 0, instead of what I modified. IMEI2 is ok.
Can I remove the wrong MEID and restore IMEI 1?
My phone is MI5s Capricorn.
Thank you
Not a tiny problem when you use Miui 8 roms if there is any for you model and there is for Mi5s.
Can I change the MEID to the original one?
Don’t you have your own QCN backup ?
No, I use the QCN file downloaded from your website. I believe that MEID stored in QCN but don’t know how to change it.
It’s not that important, I mean MEID number, your phone is working without a problem, right ?
My phone is working normally. But I just want to bring it back to original state in case I resell it.
One more question: I tried many times, but IMEI 1 is still 0, how can I solve the issue?
Flash Miui based on 8 series. Do all the steps from the beginning including to zero necessary partitions, upload your edited QCN again, the problem will be solved. After that use EU or any custom rom using twrp there won’t be a problem in the future.
I finished all the steps before restore qcn file. However, when I was restoring, I received Error:
“Memory Restore Failed!”
“Received an invalid command from the phone”
Please help.
Thanks
Hello my name is Felipe, your guide seems very useful unfortunately I tried to used for my XIAOMI MI6 and I think a ruined, I followed all the instructions to recover my IMAI making sure the correct partitions of modemst1, modemst2 and fsg. to erase from /dev/block but when I rebooted the phone I dont have WIFI, IMAI or a way to recognize SIM CARDS, is there any way to recover partitions as I dont have backup for that I only have backup for the QCN file as your the article said.
I hope it can be fixed.
That’s very normal, restoring your backed up QCN will fix them all.
This is the problem:
http://en.miui.com/forum.php?mod=viewthread&tid=848213&mobile=2
Just with QCN file is possible to fix the EFS partition ?
Yes like tried to explain in the article, it’s possible.
Ok that sounds great, unfortunately my phone is not allowing me now to connect through COM port to send QCN file using the QPST app. Is there any way to connect to the phone from fastboot or twrp ?
But what about if there is not COM port, as I dont have interface to open it :(, is possible to do it in fast boot mode ?
What you mean not allowing ? Root your phone,
adb shell
su
setprop sys.usb.config diag,adb
hey bro! i followed your guide very well but seems like my IMEI won’t stick? I did it like 5x already my IMEI still the same? my phone is a asus zenfone 3 deluxe edition its a snapdragon 820. so yeah it won’t stick if i restore it? is it possible if you send me your qcn of the phone you used here? thanks in advance.
I don’t have Zenfone 3 QCN sorry. No change even you upload edited QCN to the phone, still old imei numbers ?
Hi!
I’m Guillermo, I’ve been reading your post about how to recover the IMEI.
I didn’t make a backup and I don’t have the qcn file. I was wondering if you could send it to me.
It is a coolpad cool 1 (C103).
When I look for the 08xA line, should I change the x for the first number of mi IMEI, or should I change for the number of the IMEI that was made the backup?
Thank you
Yes, X is = the first number of the IMEI number. But I am sorry I don’t have that QCN anymore, lost all my archive because of a SSD failure…
Does this way works for LG V20 (model Sprint LS977 or US996) ? Thanks
As long as you have root, yes.
I have rooted v20 (ls997). “setprop sys.usb.config diag,adb” command is successful but it didn’t enable diag port. I tried shortcut master to search “port check test” but no result. I also tried *#546368#*997# , 3845#*997# , 277634#*# but none of them can bring up port check test menu. ##DIAG# (##3424#) can bring up a menu “DIAG” and I enabled it, but it still didn’t help to add diag port.
I chose add a new port by uncheck “show serial and usb/qc diagnostic ports only”, it showed COM4 USB/Unknown (LGE AndroidNet USB serial Port),LGUS99699cafe4).I used this port to backup, QPST got err “SPC given sould not unlock the phone. The phone will not respond for 10 seconds”
Do you know any other way I can try ? Thanks a lot.
“LG USB serial Port” is your diag port and *#546368#*997# and 277634#*# are right codes depending on your OS version, but maybe they are locked for LS997, no info in XDA ?